Fingerboards. I knew them under the brand name of Tech Decks when I was a kid. A great fidget toy or a simple DIY project that can be used to teach 3D design, 3D printing, composites, 2D design. This is also a great intro to my full skateboard design project. The process is very similar and the materials required are much easier to gather.
Tools Required:
- Computer (or phone/tablet) with an internet connection
- 3d printer
- Scissors
- Small paint brush
Materials Required:
- 3d printer filament (PLA)
- PVA glue
- Paper/cardstock
- rubber bands
- sand paper / traction tape
- fingerboard trucks, wheels, and hardware
Design
Design your fingerboard with SK8CAD. Under Example Shapes choose Fingerboard. This will pop up a warning to treat the input units as centimeters rather than inches.
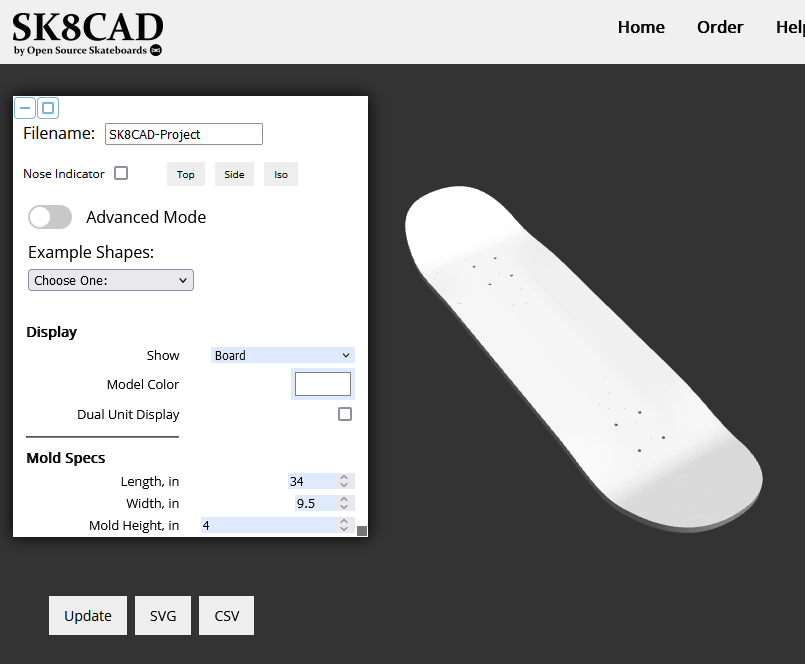
SK8CAD UI
Here’s a quick rundown of what you need to know about the SK8CAD UI. The SK8CAD User Guide under the Help menu has a lot more detail.
Give your project a unique name in the Filename: field. This will be helpful later when you save your files for manufacturing. If you are working with a gropu I always ask people to put their name in the filename.
Display
The Show field determines what shape is currently shown in the preview. I use “Board” most of the time while designing and only use the Male and Female Mold options for export.
Board:

Male Mold:

Female Mold:

Mold Specs
Once you have selected the Fingerboard example shape the mold specs will be set to length: 11 and width 4. Again these are labled inches in the SK8CAD interface but as a fingerboard they will be treated as centimeters. You can change these values if you want to make a longer or wider board but if you’re leading a workshop where a lot of these will be printed I would reccomend keeping them the same for everyone. When you print the mold it will be 11 cm x 4 cm.
Mold Height is the height of the mold. 2 cm is the default and this will be fine. You can turn this value down to make the mold thinner and speed up printing time or save a bit of material but don’t make it too thin or it won’t be stiff enough to press the board into shape.
Mold offset is the thickness of the stack of paper you are pressing to make the board. This is more useful if you were going to press more than one board in the press. If you want to measure the paper you are using and set that to a specific size you can but the default will do just fine.
Sections
This is for 3d printing full size molds. You can ignore this section for making fingerboards.
Design Your Board
This is where the fun happens! The default fignerboard is a standard street or trick skateboard but you can maipulate these values to make it what ever shape you want. You can click the Advanced Mode button a the top of the menu to get even more control. It is easy to put in values that make an impossible board so if your value turns red or the preview won’t load you probably put in a value that won’t work.
Board length is calucalted from the wheelbase, nose length, tail length, and the length of the trucks and will be updated as you change those values. Remember this is in cm not inches as labled.
Standard fingerboard trucks are 32 mm wide so keep that in mind when setting your board width. The default of 3 cm will be fine.
I reccomend starting with changing Nose and Tail length as well as the kicknose and kicktail angle. Then go down to the Shape Controls section and play with the Nose/Tail Taiper point and Nose/Tail Shape. Click the box for Advanced Shapes to get even more control.
Export
Once you have the preview looking the way you like it is time to export your design. You need to make a free SK8CAD account in order to export the STL file for manufacturing. Once you have made an account scroll back up to the top of the menu and set Show to “Male Mold” and then click “Export STL” at the bottom right corner of the screen. Change Show to “Female Mold” and export that STL as well. In the bottom left corner of the screen click “SVG to save a vector file of the outline of the board you have designed. You can optionally click the “CSV” button to download a Comma Seperated Value text file with all the settings of the board. SK8CAD has no system to save your design unless you buy a membership. Saving the CSV file will allow you to recreate the shape you jsut made with some manual effort if you really want to make that exact board again.
Manufacutre
Once you have .stl files of both sides of your mold its time for manufacturing. I reccomend 3d printing but these could be CNC milled if that’s your preferece. Load the .stl files for both sides of the mold into your slicer and send them to your printer. I’ll leave the details of printing up to you and your machine.
Preparing Deck Materials
While your molds are printing, prepare your deck materials. Whatever your final mold length and width are is how big do cut your strips of card stock. 11 cm x 4 cm is the default if you didn’t change it. These can be very rough as they’ll be cut to final size later. You’ll need about 7 layers of cardstock per board. This will depend on the stiffness of your paper and you can experiment with more or less layers or mixing and matching multiple types of paper to create decks with different stiffness.

Glue Up and Press
Once you have both molds and cardstock blanks its time for glue. Any PVA glue should work fine. I have used white Elmer’s glue and wood glue with good results. Before you start gluing know that you want to go from first glue hitting the paper to the board is in the mold in under 10 minutes. This should be plenty of time, but don’t get distracted or run our of glue halfway through the process.
Use a paintbrush to apply a thin even coat of glue on one side of the first sheet of paper. The emphasis here is on thin and even. If you use too much glue your board will be lumpy with thick glue blob in the middle and it will take too long to dry and you won’t get to play with everyone else when their’s are done. Then do the same thin even coat to one side of the next piece and lay them glue sides towards each other. Then paint glue onto one side of that stack and one side of the next piece. Repeat this process until all layers are glued up.
Place the glue up between the molds. Alignment of the paper in the mold is not critical because the blanks should be significantly wider than the finished deck. Place rubber bands around the molds to press them together. You will need several rubber bands and make sure they are tight. You can alternatively use a clamp but this is probably overkill.
Let the glue dry for 24 hours.
Shaping and Graphics
While the glue is dying you can prepare the shape and graphics for your board. You saved the .svg file from the design step right? Now is the time to use that shape. There are several options.
Laser Cutting

My prefered method is to use stair traction tape and laser cut the .svg file of the profile of the board. This file also contains the holes for the trucks. Include them in the laser cut file. I cut the tape with the grip side face down on the bed of the laser and it cuts thru just fine. I’ve done this on a 45W laser at far less than full power. Do test cut to find the right settings for your machine. Check the tape you bought to make sure its safe to cut with your laser. Once the grip tape is cut to shape you can apply it like a sticker onto your pressed board blank and cut the profile with scissors and use a small drill for the truck holes.
You can also use the laser to cut a template from stiff cardboard or other materials to trace onto your finishe board blank.
Vinyl Cutting
You can also use the .svg file to create a template with a vinyl cutter. You can either cut a vinyl sticker to be the graphics as the bottom of your board or just make a template to trace the features from paper or cardboard as suggested with the laser above.
Printing
Similar to the vinly cutter option you could design graphics in 2D design software for the bottom of the deck based on the .svg file and print it out with a black and white or color printer. You could then either use this as the bottom layer of your board when doing the glue up or glue it on after the fact.
Finishing

Once the glue is dry on your deck blank remove the rubber bands or clamps and you’ll have your pressed deck blank. Now it needs to be shaped and truck holes added.
Whichever method you choose to create a template for cutting the profile of your board in the previous step apply the sticker or trace the template and cut the blank with scissors. This can be tough, take small cuts you don’t need to get it perfect on the first pass. You can also use something like a bandsaw or sander but be careful with small parts and power tools.
Lining up the template and blank board is more of an art than science. Use your best judgement to line up the template with the mold and shape of the board. The mold should have the truck holes in it as well and you can use that as a reference to line up the truck holes in your template. If it’s not perfect it won’t be a big deal unless you’re a pro fingerboarder.
Use a 1/16 inch or 1.5 mm drill to drill the holes for the trucks. A drill press is nice for this but I end up using a hand drill most of the time.
I suggest getting a fingerboard parts kit similar to this one Make sure it includes trucks, wheels, mouting screws and a “skate tool” for the tiny screws and nuts. These are not high quality fingerboard parts but they’ll have everyone’s fingers rolling around on the workbench ready to shed.

Scale It Up
If you enjoyed this process then it’s nearly the same to take it up a notch and build a full size rideable skatebaord. I like to use this project as a feeder and the students who are really engaged with the process and looking for more get them to come back to your lab for a workshop to make a real skateboard.